INTRODUCTION
Thousands of Chromebook users every month search for how to turn on Chrome OS developer mode — and most of them have no idea they’re about to wipe their entire device. Chrome OS developer mode is one of the most misunderstood features on any laptop sold in the US today. Some users need it to run a custom bootloader. Others just want a Linux terminal, not realizing ChromeOS already offers one without any of the risk.
This guide gives you the full picture before you press a single key. You’ll learn exactly what developer mode does, whether you actually need it, how to enable it safely step by step, and what to do the moment you’re in. By the end, you’ll also know how to troubleshoot the most common failures — the kind that leave other guides’ readers stuck on a blinking recovery screen at midnight.
Do You Actually Need Developer Mode? (Decide Before You Wipe)
Most how-to guides jump straight to the key combo without asking the obvious question: do you actually need to do this? That oversight costs a lot of people their files. Chrome OS developer mode is powerful — but Linux (Crostini), which runs inside normal ChromeOS without any security changes, handles the majority of what developers actually want.
Developer mode unlocks:
- Full bash shell with root access via crosh
- Custom bootloaders and alternative operating systems (like full Linux distros)
- ADB without a USB cable
- Bypassing ChromeOS app and system restrictions entirely
Linux via Crostini gives you — without developer mode:
- A complete Linux terminal with apt package management
- VS Code, Node.js, Python, Git, and most developer tools
- ADB over USB for Android development
- Linux GUI apps running alongside your ChromeOS apps
If web development, Python scripting, or running VS Code is your goal, go to Settings → Linux → Turn on right now. You’ll have a working terminal in five minutes with zero data loss and zero security downgrade. Developer mode is the right call only when you need raw root access, want to flash a custom firmware, or plan to boot an entirely different OS outside of the Crostini container.
Before You Start: 3 Things to Check
Skipping this section is how people lose files they can’t recover and end up stuck on a recovery screen. Spend three minutes here — it saves a lot of pain.
Is Your Chromebook Managed? Check in 10 Seconds
Go to Settings → About ChromeOS. Look for the line “This device is managed by [organization name].” If that text appears, your Chromebook is enterprise-enrolled — and developer mode is blocked at the software level. The hardware workaround (disconnecting the battery on some older models) still hits a policy lock on most devices manufactured after 2019. Without your IT administrator granting access, developer mode isn’t happening on that device.
Back Up Your Data — Right Now
There is no version of enabling developer mode that skips the data wipe. ChromeOS enforces this as a core part of its security model — it’s not a bug or an oversight. Before continuing, upload everything from your Downloads folder to Google Drive, copy important files to a USB drive, and take note of any local app settings you’ll need to redo. Everything stored locally disappears in about 15 minutes.
Plug In Your Charger
Short point, serious consequence. The developer mode transition takes 10–15 minutes, and a battery dying mid-powerwash leaves your device in a partially wiped, potentially unbootable state. Plug in, confirm the charging indicator is lit, and then proceed.
How to Turn On Chrome OS Developer Mode: Step-by-Step
These steps apply to ChromeOS 120 and later, which uses a navigation menu in recovery mode. If your device runs an older version of ChromeOS, the legacy Ctrl+D shortcut is noted at each relevant step — both paths are covered.
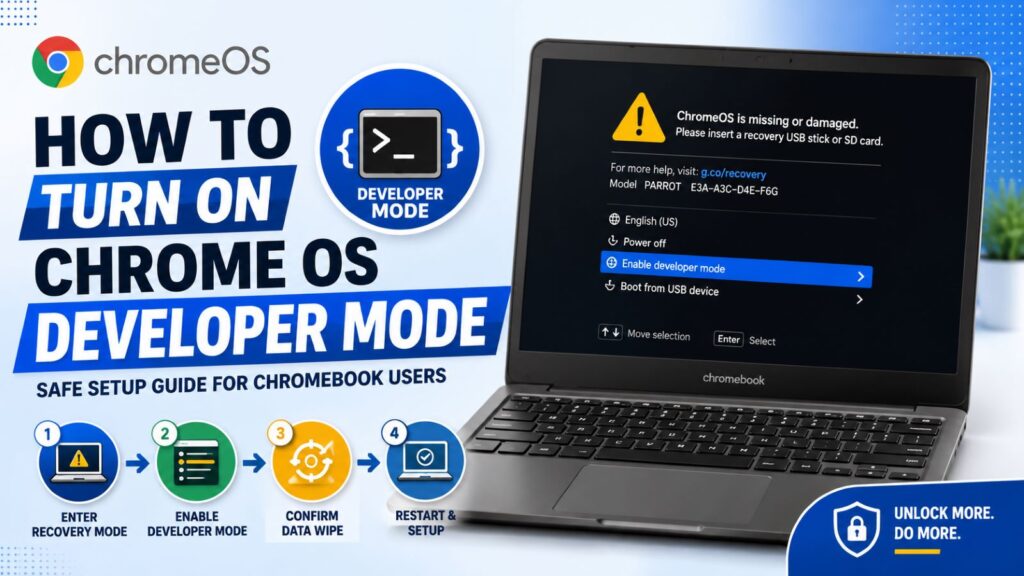
Step 1: Enter Recovery Mode
Power on your Chromebook, then press and hold Esc + Refresh + Power at the same time. The Refresh key is the circular arrow in the top row of your keyboard — the one that looks like a browser reload icon. Hold all three keys for about two seconds, then release. Your Chromebook restarts and boots into the recovery screen: a yellow exclamation triangle with the message “ChromeOS is missing or damaged.”
Brand-specific note: Acer, HP, and Lenovo Chromebooks all use this same key combo. Some Samsung Chromebooks have a small physical recovery button (usually a pinhole on the base of the device) that requires a straightened paperclip instead. If the keyboard shortcut does nothing, check your model’s manual for the recovery method.
Step 2: Navigate to “Enable Developer Mode”
On ChromeOS 120 and later, the recovery screen displays a full navigation menu. Use your arrow keys to highlight “Enable developer mode“, then press Enter.
On older ChromeOS builds, the recovery screen shows a plain message with no visible menu. Press Ctrl+D to trigger the developer mode option — it works even though nothing on screen tells you it will.
Step 3: Confirm the Data Wipe
A confirmation screen appears with a 30-second countdown. ChromeOS gives you this window to change your mind. To proceed, press Enter (or Ctrl+D on older versions). The powerwash begins immediately — ChromeOS reformats the local storage and disables verified boot. A progress bar tracks the process.
Step 4: Wait for the Restart
Do not touch the power button. The device restarts automatically when the transition finishes, then takes you through the standard first-time ChromeOS setup: language selection, Wi-Fi connection, and Google account sign-in. After you’re back at the desktop, developer mode is fully active.
Every future boot will show a white screen reading “OS verification is OFF.” That’s expected behavior — it appears because verified boot is now disabled. Press Ctrl+D to skip it and continue booting, or wait 30 seconds and ChromeOS continues on its own.
Key Combo Variations by Brand
| Chromebook Brand | Recovery Method |
| Acer, HP, Lenovo | Esc + Refresh + Power |
| Samsung (most models) | Pinhole recovery button on device base |
| Asus | Esc + Refresh + Power |
| Google Pixelbook | Esc + Refresh + Power |
| Older models (pre-2019) | May use Ctrl+D on a plain recovery screen |
What Are the Risks of Enabling Developer Mode?
Developer mode isn’t reckless — but two real tradeoffs deserve a straight answer before you commit.
Security: What “OS Verification Is OFF” Actually Means
ChromeOS normally runs Verified Boot on every startup. It cryptographically confirms the operating system hasn’t been altered since the last trusted state. Developer mode disables that check entirely. In practical terms, malware that modifies system files could survive reboots without ChromeOS catching it. For a personal Chromebook used for development at home, this is a manageable risk. However, if you use your device on a corporate network or regularly work with sensitive data, that security layer matters more than it might seem.
Does Enabling Developer Mode Void Your Warranty?
Technically, yes — for the software warranty. Google’s ChromeOS license states that modifying system software voids the software support terms. However, the hardware warranty (covering physical defects in your Chromebook) is not affected by software state. In practice, Google and most manufacturers will powerwash any device before performing hardware repairs, but they won’t refuse a legitimate hardware warranty claim simply because developer mode was enabled. Manufacturer policies vary across HP, Asus, Lenovo, and Acer, so check your specific model’s terms if warranty coverage matters to you.
What to Do After Enabling Developer Mode: First Steps
You’re in. Here’s how to actually use what you’ve unlocked — starting with the two most common developer workflows.
How to Open the ChromeOS Shell (crosh)
Press Ctrl+Alt+T anywhere in ChromeOS to open a crosh terminal tab in your browser. At the crosh> prompt, type shell and press Enter:
shell
You now have a full bash-like environment with root-level access. Run the following two commands as your first moves:
# Set a password for the chronos user — required for sudo access
sudo passwd chronos
# Confirm your ChromeOS version
cat /etc/lsb-release
Setting the chronos password is the single most important first step. Without it, many system-level commands won’t execute properly.
How to Sideload Android APKs Using ADB
Developer mode enables ADB (Android Debug Bridge), which lets you install Android apps that aren’t available in the Play Store. Enable Linux first via Settings → Developers → Linux development environment, then open the Linux terminal and run:
adb devices
Connect your Android device via USB, accept the authorization prompt on the Android device, and you’re ready to push APKs with adb install yourapp.apk.
Chrome OS Flex Users: Your Process Is Completely Different
Chrome OS Flex runs on non-Google hardware — old Windows laptops and desktops repurposed as Chromebooks. The Esc+Refresh+Power combo does nothing on Flex devices because there’s no hardware Refresh key and no ChromeOS firmware managing the recovery sequence. Enabling developer mode on Flex requires booting a separate Linux USB drive and editing the grub.cfg file in the EFI partition — a process that goes well beyond a beginner guide. If you’re on Chrome OS Flex, the steps above don’t apply. Look specifically for a Chrome OS Flex developer mode guide for your hardware.
How to Turn Off Developer Mode on a Chromebook
Disabling developer mode works the same way as enabling it — and, just like enabling it, triggers a full data wipe. Enter recovery mode again with Esc+Refresh+Power, then navigate to “Return to secure mode” and press Enter. Alternatively, on the “OS verification is OFF” startup screen, press Space to immediately initiate the return to secure mode. ChromeOS re-enables verified boot, powerwashes the device, and reboots to the factory setup screen.
Troubleshooting: Developer Mode Not Working?
“Enable Developer Mode” Doesn’t Appear in the Recovery Menu
Your device is almost certainly enterprise-enrolled. Double-check by going to Settings → About ChromeOS — any management banner confirms it. No reliable software workaround exists for this on modern managed devices. Contact your school or IT department for options.
Stuck on the “OS Verification Is OFF” Screen
Nothing is wrong. Developer mode shows this screen on every single boot. Press Ctrl+D to continue immediately, or wait 30 seconds for ChromeOS to boot on its own. If you want to exit developer mode from this screen, press Space — that initiates the return-to-secure-mode process, which triggers another data wipe.
Chromebook Reboots in a Loop or Freezes During Powerwash
Hold the Power button for 10 seconds to force a hard shutdown. Plug in your charger, then re-enter recovery mode with the Esc+Refresh+Power combo and try again from Step 2. If the loop persists after a second attempt, you need a USB recovery image. Download the Chromebook Recovery Utility from Google’s official support page, create a recovery USB with your exact device model, and use it to restore ChromeOS before trying developer mode again.
CONCLUSION
You now know exactly how to turn on Chrome OS developer mode — and more importantly, you know whether you should. The steps themselves take about 15 minutes, but the real work is understanding what you’re trading: a full local data wipe and a permanently reduced security posture in exchange for root-level access to your device.
For most developers in the US who want a Linux terminal, VS Code, or Python on their Chromebook, Linux via Crostini is the faster, safer path. However, if you genuinely need raw shell access, custom firmware, or the ability to boot an alternative OS, developer mode is the right tool — and now you can enable it without surprises.
Your next move after enabling: open crosh (Ctrl+Alt+T → type shell), set your chronos password, and start building. If anything goes wrong, the troubleshooting section above has you covered. Bookmark this guide before you close it — the recovery loop fix is the one section you’ll thank yourself for later.
FAQ
Q1: How do I turn on Chrome OS developer mode? A: Press Esc + Refresh + Power to enter recovery mode, select “Enable developer mode” from the menu, confirm the data wipe, and wait 10–15 minutes for ChromeOS to restart. Back up all local files first.
Q2: Does enabling Chrome OS developer mode delete everything on my Chromebook? A: Yes — enabling developer mode triggers a full powerwash that erases all locally stored files. Google Drive files and cloud data remain safe. Always back up your Downloads folder before starting.
Q3: Can I enable developer mode on a school Chromebook? A: Usually no. School-issued Chromebooks are enterprise-enrolled, and Google blocks developer mode via policy on managed devices. Contact your IT administrator — some schools grant developer access for specific use cases.
Q4: Is Chrome OS developer mode the same as the developer channel? A: No. The developer channel is a software update track that delivers early ChromeOS updates — it’s safe and requires no data wipe. Developer mode disables OS security protections and triggers a full wipe. They are completely independent settings.
Q5: Will developer mode slow down my Chromebook’s performance? A: No. Developer mode has negligible performance impact. ChromeOS skips the verified boot security check on startup, but that doesn’t free processing resources in any noticeable way. Speed remains identical.
Q6: What can I do with Chrome OS developer mode once it’s enabled? A: Developer mode gives you access to the full bash shell via crosh, root-level system commands, Android ADB without a USB cable, and the ability to install custom bootloaders or alternative operating systems. Open crosh with Ctrl+Alt+T, then type shell to get started.